As I briefly explained at one of the earlier postings (2020/06/04 - [Programming/C++] - [Basic C++] 13 – Data Structure in C++ : What is a CLASS, definition, and explanation), polymorphism is one of the four major concepts of OOP. Polymorphism is often described as "One form with multiple functionalities", but it is not enough for someone who does not have a computer engineering background.
We have already covered what a pointer to a class and virtual functions are before. Once again, let's recap what are their definitions and how to use them well to step forwards to polymorphism.
1. Pointer to Class and Virtual Function
Since a class is just a data type no difference with the built-in data types (int, float, and char, etc), we can declare a pointer to a class too. Code example 1 is the same example I showed you at the last posting. One base class and its derived class are declared. Within the main function, two Class A type pointers are declared. Pointer "pa" points to an object of class A, and pointer "pb" points to the object of class B. Be aware that the pointers are class A type, not B.
The only class member in A is a "print_name" function and its virtual since the function with the same name is also declared within the class B. The keyword "override" is used to explicitly declare that the function is "virtual". What we must be aware of in this example is that we could use the class A pointer to point the object of class B, not A. This means that the class pointer is "Type Compatible".
Code example 1
#include <iostream>

class A
{
public:
	virtual void print_name()
	{
		std::cout << "Class A" << std::endl;
	}
};

class B : public A
{
public:
	void print_name() override
	{
		std::cout << "Class B" << std::endl;
	}
};

void print_name(A* p)
{
	p->print_name();
}

int main()
{
	A* pa = new A;
	A* pb = new B;

	print_name(pa);
	print_name(pb);
}
We don't have to create the class B pointer to point the B object, as the class A pointer can still point the B object. This is a huge advantage, as you don't need to create a new pointer every time you declare a new object. This is why we call the technique "Polymorphism"; Poly (Many) Morph (Forms).
2. Polymorphic Class
2.1) Virtual members and polymorphism
A polymorphic class is a class that has virtual class members, thus you can redefine the virtual members later in the derived classes. Figure 1 is the concept of a program to define animals. The "animal" base class has six inherited classes. Each base class is a unique animal and we want to control all of them at once. How can we control easily without copy and paste the same command multiple times?.
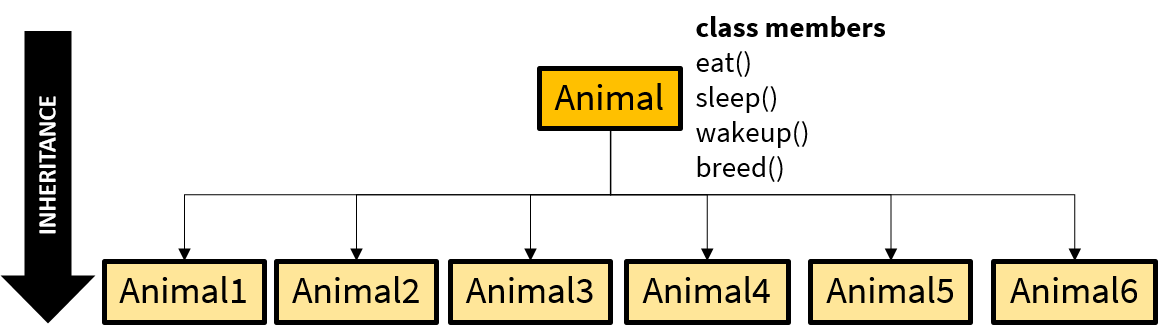
The answer is Polyphormism. If we make the common functions of each animal virtual, we can control them without making a new pointer for each animal, but the pointer to the base class will work for every object. Code example 2 below shows a program with one base class and two derived classes. All of the class members in the base class are virtual functions.
Code example 2
// CODE STARTS //
#include <iostream>

class Animal
{
public:
	virtual void sleep()
	{
		std::cout << "Animal is going to bed." << std::endl;
	}
	virtual void wake_up()
	{
		std::cout << "Animal is going to wake up." << std::endl;
	}
	virtual void print_name()
	{
		std::cout << "My name is Animal" << std::endl;
	}
};

class Animal_1 : public Animal
{
public:
	void sleep() override
	{
		std::cout << "Animal 1 is going to bed." << std::endl;
	}
	void wake_up()override
	{
		std::cout << "Animal 1 is going to wake up." << std::endl;
	}
	void print_name()override
	{
		std::cout << "My name is Animal 1" << std::endl;
	}
};

class Animal_2 : public Animal
{
public:
	void sleep()override
	{
		std::cout << "Animal 2 is going to bed." << std::endl;
	}
	void wake_up()override
	{
		std::cout << "Animal 2 is going to wake up." << std::endl;
	}
	void print_name()override
	{
		std::cout << "My name is Animal 2" << std::endl;
	}
};
int main()
{
	Animal* pA1 = new Animal_1;
	Animal* pA2 = new Animal_2;

	pA1->print_name();
	pA1->sleep();
	pA1->wake_up();
	pA2->print_name();
	pA2->sleep();
	pA2->wake_up();
}

// CODE ENDS //

// OUTPUT //
My name is Animal 1
Animal 1 is going to bed.
Animal 1 is going to wake up.
My name is Animal 2
Animal 2 is going to bed.
Animal 2 is going to wake up.
The pointers to the base class are declared and each derived object is assigned. Next, three virtual functions are called for each object using the arrow operator. This a very simple example but shows a great advantage of this technique well.
2.2) Static and dynamic binding
Now I will explain why this virtual keyword is really needed in your program from the perspective of the compiler. When we declare and call a function, the compiler "binds" the call with the function declaration during the compile time. The problem is that the compiler does not really look deep into each line of code. Therefore, we need "virtual" keyword to order the compiler to match the call with the right function. This is referred to as "Dynamic Binding".
In order to understand the role of "virtual" keyword in your program from the perspective of the compiler, the understanding of static and dynamic bindings is necessary. When we declare and call a function, the compiler "binds" the call with the function declaration during the compile time. This is referred to as "Static Binding". The problem is that the compiler does not really look deep into each line of code. Therefore, we need "virtual" keyword to order the compiler to match the call with the right function. This is referred to as "Dynamic Binding".
The concepts of each binding have already been explained in the preceding example using a base class pointer to point a derived class object. Without a virtual keyword, the compiler matches the function call to the derived class object to the base class. Look at the below example code.
Code exampe 4
// Static binding and dynamic binding
// Code exmaple 4
#include <iostream>
class Base
{
public:
    virtual void function_A()
    {
        std::cout << "Base Class Function A" << std::endl;
    }
    void function_B()
    {
        std::cout << "Base Class Function B" << std::endl;
    }
};

class Derived : public Base
{
public:
    void function_A() override
    {
        std::cout << "Overrided Derived Class Function A" << std::endl;
    }
    void function_B()
    {
        std::cout << "NOT Overrided Derived Class Function B" << std::endl;
    }
};

int main()
{
    Base* pa = new Base;
    Base* pb = new Derived;
    pa->function_A(); //Dynamic Binding
    pa->function_B(); //Static Binding
    pb->function_A(); //Dynamic Binding
    pb->function_B(); //Static Binding
}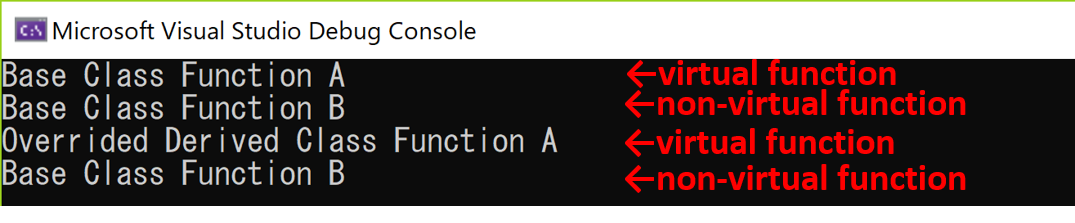
The base class pointer "pa" and "pb" are declared and point to the base class object and derived class object respectively. Even though the pointers "pa" and "pb" point different objects, due to the fact that the type of the pointers is the same, the compiler matches the pointers to the base class, not to the derived class. On the other hand, the compiler does not bind the call and definition of a virtual function during the compile time but the runtime.
Of course, a dynamic binding is not free and decreases the memory efficiency of your program slightly. As the compiler has to create additional code to bind a virtual function call and its definition during runtime.
3. Dynamic class objects declaration
What if we had 100 objects, not 2 objects? or even 10,000 objects?. It would take for a long period of time for us to write a command for each object. In order to solve the problem, we can take advantage of an array filled with class pointers pointing objects within a for loop.
Code example 3
//CODE STARTS
// Polymorphism Example 03
#include <iostream>
class Base
{
private:
    int a;
public:
    virtual void print_elements()
    {
        std::cout << "This is a base class. Private value is " << a << std::endl;
    }
};
class Derived : public Base
{
private:
    int a{ 0 };
public:
    Derived(int init_a): a(init_a) {};
    void print_elements() override
    {
       std::cout << "---This is a derived class object [" << a << "]---" << std::endl;
    }
};

int main()
{
    // b is a Base type double pointer pointing to the array of Base pointers.
    // b is declared on stack and *b is declared on heap. *b points to each derived class object.
    Base** b = new Base*[5];
    for (int i = 0; i < 5; i++)
    {
        b[i] = new Derived(i);
        b[i]->print_elements();
        std::cout << "(1) The address of \"b\"             = " << &b << std::endl;
        std::cout << "(2) The address of \"pointet array\" = " << &b[i] << std::endl;
        std::cout << "(3) The address of \"object\"        = " << b[i] << std::endl;
    }
}
//CODE ENDS

//RESULTS
---This is a derived class object [0]---
(1) The address of "b"             = 0000009FFAD7F668
(2) The address of "pointet array" = 0000009FFAF5FF80
(3) The address of "object"        = 0000009FFAF5C230
---This is a derived class object [1]---
(1) The address of "b"             = 0000009FFAD7F668
(2) The address of "pointet array" = 0000009FFAF5FF88
(3) The address of "object"        = 0000009FFAF5CAD0
---This is a derived class object [2]---
(1) The address of "b"             = 0000009FFAD7F668
(2) The address of "pointet array" = 0000009FFAF5FF90
(3) The address of "object"        = 0000009FFAF5C650
---This is a derived class object [3]---
(1) The address of "b"             = 0000009FFAD7F668
(2) The address of "pointet array" = 0000009FFAF5FF98
(3) The address of "object"        = 0000009FFAF5C050
---This is a derived class object [4]---
(1) The address of "b"             = 0000009FFAD7F668
(2) The address of "pointet array" = 0000009FFAF5FFA0
(3) The address of "object"        = 0000009FFAF5C830
The above example creates a base class and a derived class. Within the main function, an array of Base class pointers is declared on heap and each element of the array is assigned to an object of the derived class. A double pointer is used in this example to create an array of pointers. This might be very confusing for someone who is not used to double pointers in C++. However, it is just a simple chain of pointers that you can easily track down step by step.
A double pointer is declared on stack. As a pointer stores an address of a variable, a double pointer stores an address of a pointer. A double pointer is sometimes a very convenient way to express data that need to be transformed to be seen. In this example, the double pointer is used to make an array of the base class pointer to point the objects of the derived class.
Base** b; // Double pointer b declared on stack

new Base*[4] // Array of Base type pointers, not base objects.

b[i] = new Derived(i) // Assigning a Dervied type object to the Base type pointer in the array.
Now, see the difference between the two lines of code.
// This creates an array filled with the "Base" type pointers
Base**b = new Base* [4];

// This creates an array filled with the "Base" type objects.
Base *b = new Base [4];
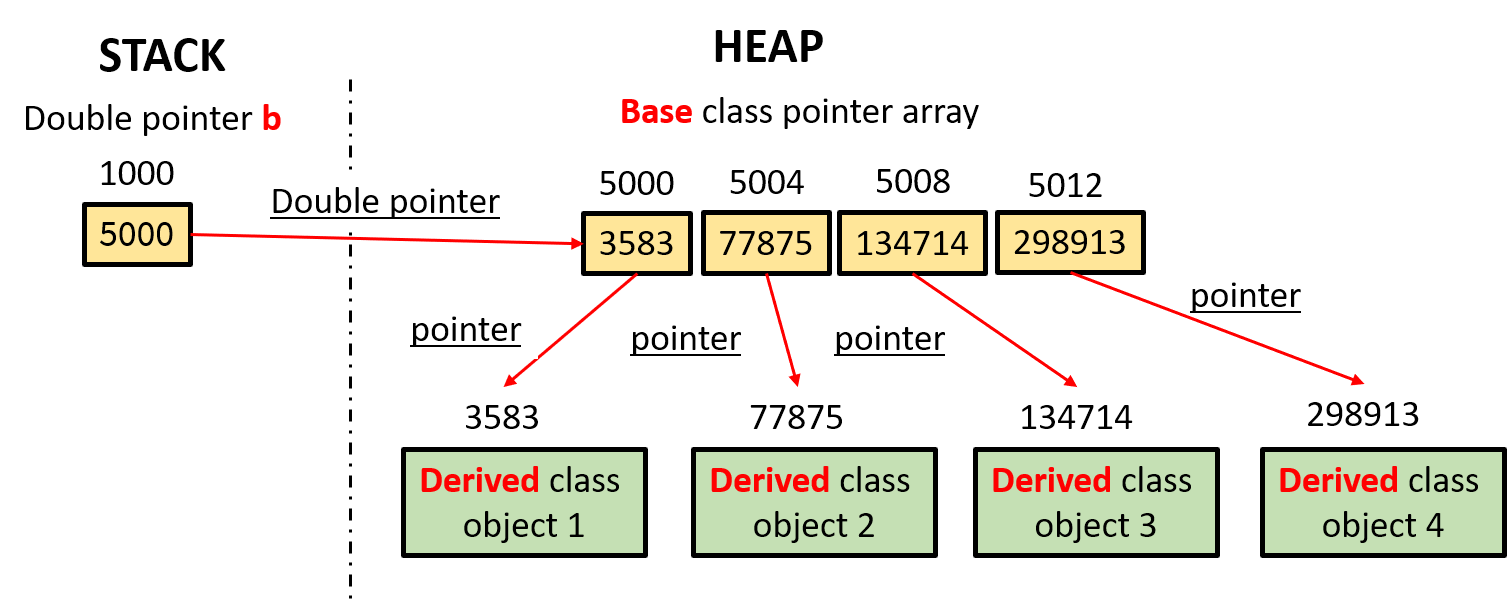
Figure 1 is a schematic showing the algorithm of the example code. The double pointer "b" stores the address of the pointer array and each element fo the array points to the derived class object. As you can see from the figure, we can get three different address for each object which are,
[1] The address of the double pointer "b" - 1000
[2] The address of the pointer array element - 5000
[3] The address of the object - 3583
We have already studied how to get an address of a variable before. Thus the actual code to return the three addresses is,
        std::cout << "(1) The address of \"b\"             = " << &b << std::endl;
        std::cout << "(2) The address of \"pointet array\" = " << &b[i] << std::endl;
        std::cout << "(3) The address of \"object\"        = " << b[i] << std::endl;
The ampersand sign is a reference operator to obtain the address of a given variable. Thus the expression "&b" returns the address of the double pointer "b" on stack. The square-bracket operator is a pointer deference operator to obtain the value of a given variable. Thus the expression "b[i]" returns the value of the array element at the given index "i", which is the address of the assigned object. Finally the expression "&b[i]" returns the address of the array element, which is also a value of the double pointer "b".
The above-explained chain of pointer seems a bit complex. A simple schematic can increase your understanding of pointer operations a lot better than just a simple set of code. The introduced double pointer technique might be difficult to follow at the moment; however, it will increase the efficiency of your program greatly, once you get the hang of it.
'Programming > C++ Basic' 카테고리의 다른 글
| [Basic C++] 19 - Static and Const keywords in C++ (0) | 2020.07.14 |
|---|---|
| [Basic C++] 18 - Data Structure in C++ : Friend (0) | 2020.07.06 |
| [Basic C++] 16 - Data Structure in C++ : Class Virtual Function (0) | 2020.06.15 |
| [Basic C++] 15 – Data Structure in C++ : Class Single Inheritance (0) | 2020.06.13 |
| [Basic C++] 14 – Data Structure in C++ : Class Constructor and Destructor (0) | 2020.06.13 |


